How to Teach the R Sound
The R sound should be developed by age 8, according to the Iowa-Nebraska Norms. However, it is not uncommon for this sound to not emerge by the expected age. If that happens, a child is often referred to a Speech-Language Pathologist (SLP) for an evaluation and therapy. This sound is actually one of the hardest for children to produce, which is why it is the last one to develop. Many SLPs have clients on their caseloads for years just to address this sound. Below are a few tips on how to teach the R sound and ideas for practice activities ⬇️
The R Sound
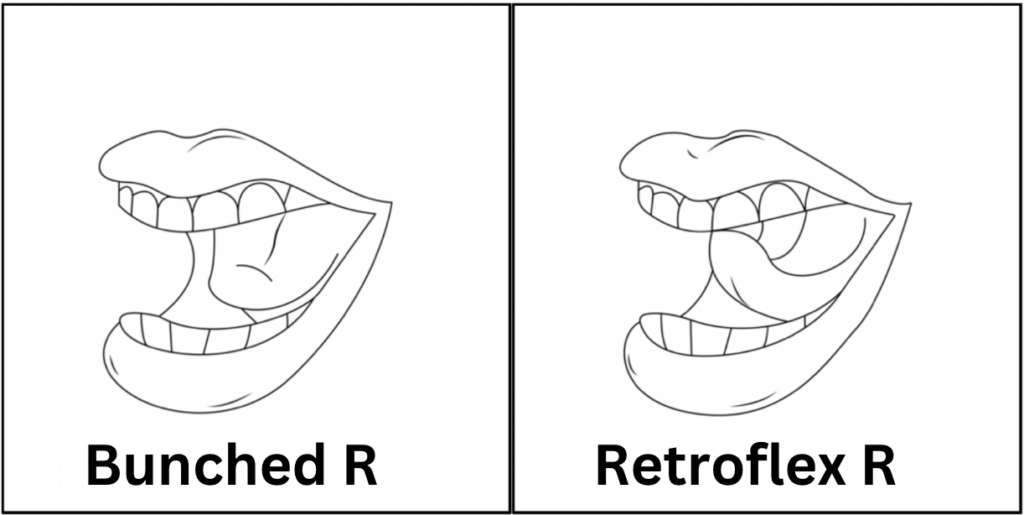
There are two ways to produce the R sound- bunched vs. retroflex. These are just how they sound. For the bunched R, the tongue is pulled back, or bunched up, with the sides close to the top teeth. Some people use the image of a mountain. For
the retroflex R, the tongue tip is curled up and backward like a ‘C.’
One reason R is difficult to produce is because there are no oral landmarks. In all other consonants in English, the
articulators make contact with each other. For R, the tongue is just hanging out in the oral cavity. Some languages don’t have this sound, or it is produced as flapped, with the tongue tip behind the alveolar ridge like the /d/ sound or trilled, like the rolled ‘R’ in Spanish.
Another reason the R sound is difficult is vowels. Vocalic /ɹ/, which refers to any /ɹ/ that follows a vowel, like -er and -air,
takes on vocalic properties depending on what vowel comes before it. Typically -er, as in ‘earth,’ is the most difficult, especially the blend –erl as in ‘girl, world.’ So, this means there are many types of /ɹ/ productions to learn.
Eliciting the R Sound
Here are four elicitation techniques to teach the R sound. You can try them separately or in combination with each other.
1. Point the Finger
Most people produce a retroflex R, which looks like a backward ‘C.’ To help the client know where to point their tongue, have them place a finger on the back of their head and tell them to point their tongue to their finger.
2. Lie on the Floor
Since R is produced towards the back of the mouth, let gravity help out and have the client lie on the floor while practicing.
3. Open the Jaw
Most people think that R is all in the tongue, and most of it is but jaw position does impact tongue placement. If the jaw is too closed or too open, the client won’t be able to get the tongue in the correct position or use the right amount of tension. Have the client open their jaw when practicing R.
Usually, just reminding your client to open their mouth is enough of a reminder. To make it more fun, or for clients who need a tactile cue, stick a small piece of candy in between the teeth to keep the jaw open.
4. Add Tongue Tension
In addition to tongue placement and jaw height, tongue tension is another factor in producing R. This can be tricky for most clients. Remind the client to squeeze their tongue while practicing R. To add a tactile cue, have them squeeze a stress ball or make a fist at the same time.
For tricky words, view my post on Articulation Therapy Techniques for Tricky Words.
Activities for Practicing the R Sound
When first teaching a sound, stick with words or phrases that are easy for the client and that they can say over and over. A few examples are below to teach the R sound.
- Play a board game and have the client say “ready” before taking a turn
- Play a board game with dice and have the client say “roll” before rolling the dice
- Play Connect Four and have the client say “row + number”
- Make a MadLibs and have the client fill in the blanks with target words that contain R
View my articulation cards for R HERE. What elicitation techniques do you use for R? What are your favorite activities for R? Let us know below ⬇️
One Comment